- Published on
How to Set Up Presence Detection in Home Assistant
- Authors

- Name
- Simply Smart House
- Understanding MMWave Technology
- Hardware Prerequisites
- The Flashing Process
- Connecting and Configuring the Device
- Wiring the Sensor
- Integrating the Presence Sensor
- D1 Mini Code
- ESP32 Code
- Automation Based on Presence
- Conclusion
Presence detection in Home Assistant can save you time and energy. Follow these simple steps to set it up and start enjoying a more efficient home.
Understanding MMWave Technology
Before we dive into the implementation details, let's take a moment to understand the technology behind mmWave sensors. Think of it as a radar sensor that operates similarly to how a bat navigates in a dark cave. Using waves to detect objects, mmWave sensors can accurately detect a person's breathing and movements. By leveraging this technology, we can achieve precise and reliable presence detection in our Home Assistant setup.
Hardware Prerequisites
To get started with presence detection, you'll need some essential hardware components. There are two options available, depending on your comfort level with soldering:
- Option 1: ESP32 (No Soldering Required) - This option utilizes an ESP32 board, the LD1115H sensor, and four jumper wires. It's a straightforward setup that eliminates the need for soldering.
LD1115H MMWave Sensor (AliExpress)
- Option 2: D1 Mini (Requires Soldering) - If you're comfortable with soldering, you can choose the D1 Mini, the LD1115H sensor, and four jumper wires for your presence detection system.
LD1115H MMWave Sensor (AliExpress)
Both options are affordable and accessible, making them suitable for DIY enthusiasts and beginners alike.
The Flashing Process
Once you have your hardware ready, the next step is to flash the required software to your device. The flashing process involves installing ESPHome, a powerful tool that allows us to integrate custom firmware with Home Assistant seamlessly. Here's a step-by-step guide to the flashing process:
- Add the ESPHome integration

- Ensure that you have the correct URL and click "Open Link" to access the ESPHome web interface.
- Click on "Install" to start the installation process.
- Optionally, you can enable the watchdog and show it in sidebar.
- Once the installation is complete, click on "Open Web UI" to access the ESPHome dashboard.
Connecting and Configuring the Device
- Connect your device to your computer using a data cable and click on "Connect" in the ESPHome web interface.
- Select your device from the list of available devices and click "Connect" to establish a connection.
- On the ESPHome dashboard, click on "Prepare for First Use" and then install.
- Note: Depending on your device, you may need to hold the boot button before installing the firmware.
- Once the installation is complete, connect your device to your Wi-Fi network to ensure seamless communication with Home Assistant.
- Return to Home Assistant, and you should see your device listed in the ESPHome screen. Click on "Adopt" to add it to your setup.
- Give your device a meaningful name, such as "studio-presence" or any other descriptive name that suits your setup.
- After adopting the device, click skip and close.
- click on the three dots and "rename hostname" give it a name such as "studio-presence".
Wiring the Sensor
To make your presence detection system functional, you need to wire the mmWave sensor to your device. Depending on the hardware option you chose, follow these wiring instructions:
For the D1 Mini:

- Vcc to 5v
- Ground to ground
- URX to TX
- UTX to RX
For the ESP32:
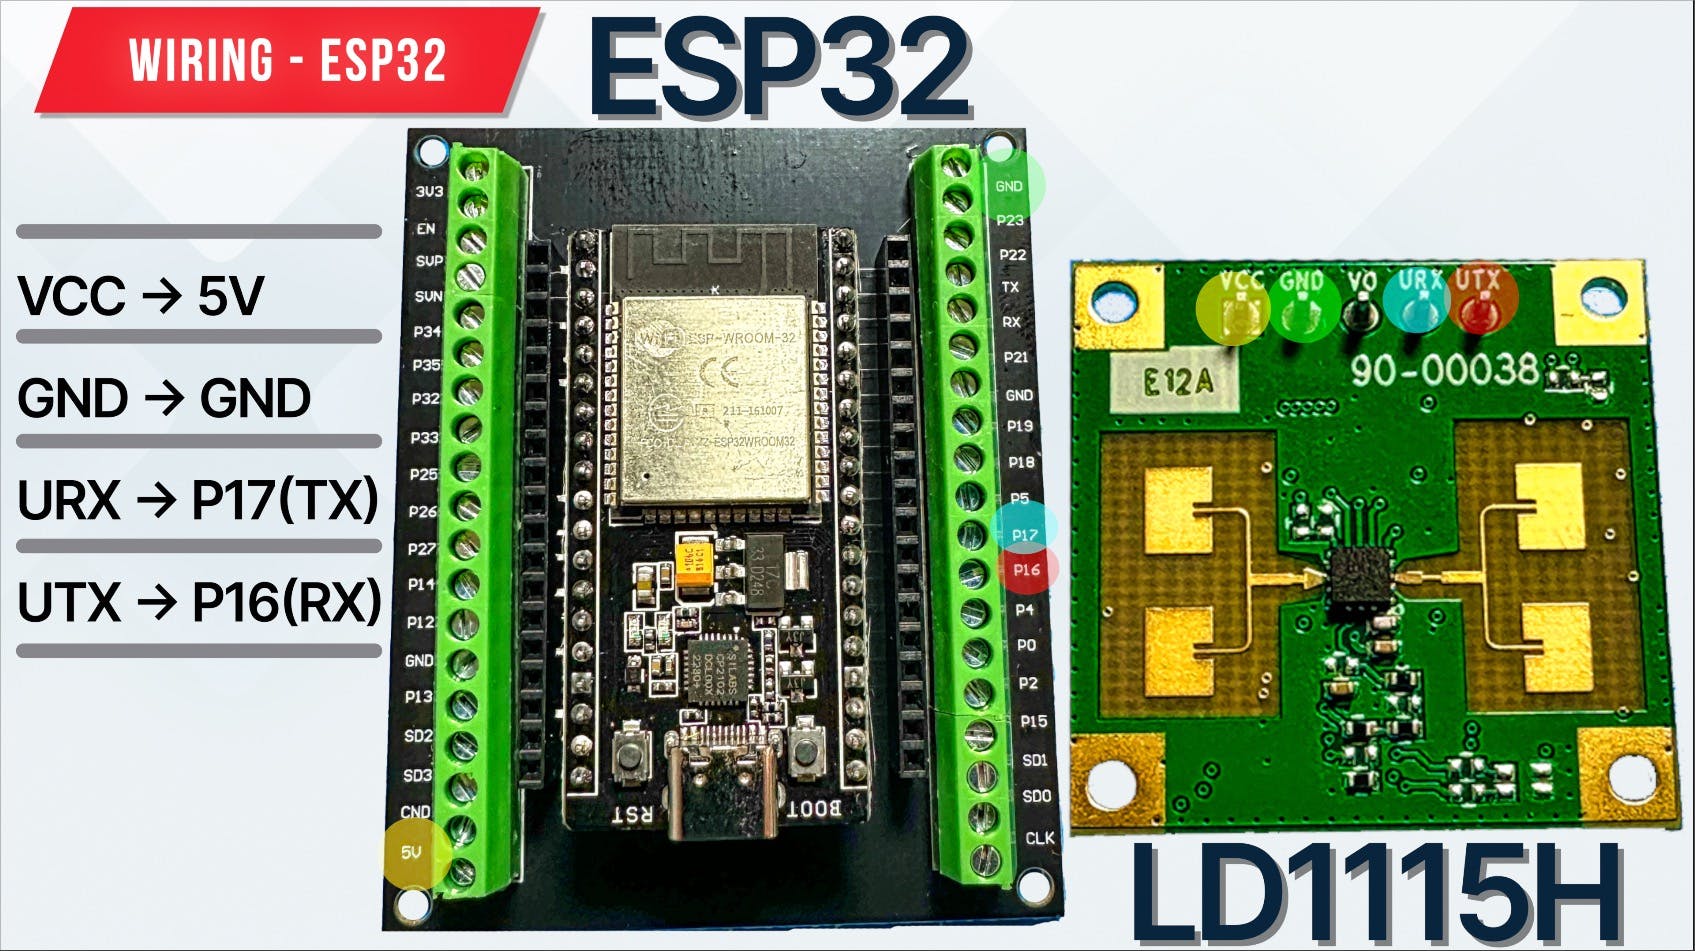
- Vcc to 5v
- Ground to ground
- URX to P17 (TX)
- UTX to P16 (RX)
Integrating the Presence Sensor
- Return to ESHPhome and click "Edit" on your device.
- Copy the inital configuration so you could refernce it later.
- Delete the configuration and paste this configuration depending on your device:
I used patrick3399 work, and tweaked it a bit for my needs.
D1 Mini Code
esphome:
  friendly_name: Studio Presence # Can be anything you like
  name: 'studio-presence' # Make sure to have the same value as in "host name" from previous steps
  on_boot: #LD1115H Initial Setting
    priority: -200
    then:
      - uart.write:
          id: LD1115H_UART_BUS
          data: !lambda |-
            std::string th1st = "th1=" + str_sprintf("%.0f",id(LD1115H_TH1).state) +" \n";
            return std::vector<uint8_t>(th1st.begin(), th1st.end());
      - uart.write:
          id: LD1115H_UART_BUS
          data: !lambda |-
            std::string th2st = "th2=" + str_sprintf("%.0f",id(LD1115H_TH2).state) +" \n";
            return std::vector<uint8_t>(th2st.begin(), th2st.end());

esp8266:
  board: esp01_1m
  framework:
    version: recommended

external_components:
  - source:
      type: git
      url: https://github.com/ssieb/custom_components #Thanks for @ssieb components.
    components: [serial]

# Enable logging
logger:
  level: DEBUG #You Can Use "INFO" Level
  baud_rate: 0

# Enable Home Assistant API
api:
  encryption:
    key: 'YOUR_ENCRYPTION_KEY' ####### Add your encryption key here #######

ota:

wifi:
  ssid: !secret wifi_ssid
  password: !secret wifi_password

  # Enable fallback hotspot (captive portal) in case wifi connection fails
  ap:
    ssid: 'YOUR_AP_SSID' ####### Add your AP SSID here #######
    password: 'YOUR_AP_PASSWORD' ####### Add your AP Password here #######

captive_portal:

uart:
  id: LD1115H_UART_BUS
  rx_pin: GPIO3 #For ESP32, you can use any pin, Recommend Use UART_2, Don't use UART_0, It might Cause Boot Fail or System Hang
  tx_pin: GPIO1 #For ESP32, you can use any pin, Recommend Use UART_2, Don't use UART_0, It might Cause Boot Fail or System Hang
  baud_rate: 115200
  data_bits: 8
  stop_bits: 1
  parity: NONE
  setup_priority: 200 #Set Priority To Prevent Boot Loop or Fail
#  debug:
#    direction: BOTH
#    dummy_receiver: false
#    after:
#      delimiter: "\n"
#    sequence:
#      - lambda: UARTDebug::log_string(direction, bytes);
globals:
  - id: LD1115H_Last_Time
    type: time_t
    restore_value: no
    initial_value: time(NULL)
  - id: LD1115H_Last_Mov_Time
    type: time_t
    restore_value: no
    initial_value: time(NULL)
  - id: LD1115H_Clearence_Status
    type: bool
    restore_value: no
    initial_value: 'false'
status_led:
  pin:
    number: GPIO2 #ESP32 OnBroad LED
    inverted: false
#web_server:   #Avoid Using Web Server To Prevent Hang
#  port: 80
interval:
  - interval: 1s #Clearance Scan Time
    setup_priority: -200
    then:
      lambda: |-
        if ((time(NULL)-id(LD1115H_Last_Time))>id(LD1115H_Clear_Time).state) {
          if ((id(LD1115H_Clearence_Status) == false) || (id(LD1115H_Occupancy).state != "Clearance")) {
            id(LD1115H_Occupancy).publish_state("Clearance");
            id(LD1115H_Clearence_Status) = true;
          }
          if (id(LD1115H_MovOcc_Binary).state == true) {
            id(LD1115H_MovOcc_Binary).publish_state(false);
          }
          if (id(LD1115H_Mov_Binary).state == true) {
            id(LD1115H_Mov_Binary).publish_state(false);
          }
        }
number:
  - platform: template
    name: Movement/Motion Sensitivity #TH1 is Movement/Motion Sensitivity
    id: LD1115H_TH1
    icon: 'mdi:cogs'
    optimistic: true
    restore_value: true #If you don't want to store the setting at ESP, set it to false.
    initial_value: '120' #Default TH1 Setting
    min_value: 20
    max_value: 1200
    step: 10
    set_action:
      then:
        - uart.write:
            id: LD1115H_UART_BUS
            data: !lambda |-
              std::string th1st = "th1=" + str_sprintf("%.0f",x) +" \n";
              return std::vector<uint8_t>(th1st.begin(), th1st.end());
  - platform: template
    name: Occupancy/Presence Sensitivity #TH2 is Occupancy/Presence Sensitivity
    id: LD1115H_TH2
    icon: 'mdi:cogs'
    optimistic: true
    restore_value: true #If you don't want to store the setting at ESP, set it to false.
    initial_value: '250' #Default TH2 Setting
    min_value: 50
    max_value: 2500
    step: 10
    set_action:
      then:
        - uart.write:
            id: LD1115H_UART_BUS
            data: !lambda |-
              std::string th2st = "th2=" + str_sprintf("%.0f",x) +" \n";
              return std::vector<uint8_t>(th2st.begin(), th2st.end());
  - platform: template
    name: Clearence Time
    id: LD1115H_Clear_Time
    icon: 'mdi:cogs'
    optimistic: true
    restore_value: true #If you don't want to store the setting at ESP, set it to false.
    initial_value: '5' #LD1115H Mov/Occ > Clearence Time Here
    min_value: 0.5
    max_value: 20
    step: 0.5
  - platform: template
    name: Movement Time
    id: LD1115H_Mov_Time
    icon: 'mdi:cogs'
    optimistic: true
    restore_value: true #If you don't want to store the setting at ESP, set it to false.
    initial_value: '1' #LD1115H Mov > Occ Time Here
    min_value: 0.5
    max_value: 10
    step: 0.5
sensor:
  - platform: wifi_signal
    name: WiFi Signal
    update_interval: 60s
  - platform: uptime
    name: Uptime
  - platform: template
    name: Spectral line
    id: LD1115H_Spectral
    icon: 'mdi:radar'
    unit_of_measurement: ''
    accuracy_decimals: 0
  - platform: template
    name: Signal Strength
    id: LD1115H_Signal
    icon: 'mdi:signal-distance-variant'
    unit_of_measurement: ''
    accuracy_decimals: 0
    filters: # Use Fliter To Debounce
      - sliding_window_moving_average:
          window_size: 8
          send_every: 2
      - heartbeat: 0.2s
text_sensor:
  - platform: wifi_info
    ip_address:
      name: IP Address
    ssid:
      name: SSID
    bssid:
      name: BSSID
    mac_address:
      name: Mac Address
  - platform: serial
    uart_id: LD1115H_UART_BUS
    name: UART Text
    id: LD1115H_UART_Text
    icon: 'mdi:format-text'
    internal: False #If Don't Want to See UART Receive Data, Set To True
    on_value:
      lambda: |-
        if (id(LD1115H_UART_Text).state.substr(0,3) == "occ") {
          id(LD1115H_Signal).publish_state(atof(id(LD1115H_UART_Text).state.substr(7).c_str()));
          id(LD1115H_Spectral).publish_state(atof(id(LD1115H_UART_Text).state.substr(5,2).c_str()));
          if ((time(NULL)-id(LD1115H_Last_Mov_Time))>id(LD1115H_Mov_Time).state) {
            id(LD1115H_Occupancy).publish_state("Occupancy");
            if (id(LD1115H_MovOcc_Binary).state == false) {
              id(LD1115H_MovOcc_Binary).publish_state(true);
            }
            if (id(LD1115H_Mov_Binary).state == true) {
              id(LD1115H_Mov_Binary).publish_state(false);
            }
          }
          if (id(LD1115H_MovOcc_Binary).state == false) {
            id(LD1115H_MovOcc_Binary).publish_state(true);
          }
          id(LD1115H_Last_Time) = time(NULL);
          if (id(LD1115H_Clearence_Status) == true) {
            id(LD1115H_Clearence_Status) = false;
          }
        }
        else if (id(LD1115H_UART_Text).state.substr(0,3) == "mov") {
          id(LD1115H_Signal).publish_state(atof(id(LD1115H_UART_Text).state.substr(7).c_str()));
          id(LD1115H_Spectral).publish_state(atof(id(LD1115H_UART_Text).state.substr(5,2).c_str()));
          id(LD1115H_Occupancy).publish_state("Movement");
          if (id(LD1115H_MovOcc_Binary).state == false) {
            id(LD1115H_MovOcc_Binary).publish_state(true);
          }
          if (id(LD1115H_Mov_Binary).state == false) {
            id(LD1115H_Mov_Binary).publish_state(true);
          }
          id(LD1115H_Last_Mov_Time) = time(NULL);
          id(LD1115H_Last_Time) = time(NULL);
          if (id(LD1115H_Clearence_Status) == true) {
            id(LD1115H_Clearence_Status) = false;
          }
        }
  - platform: template
    name: Occupancy Status
    id: LD1115H_Occupancy
    icon: 'mdi:motion-sensor'
binary_sensor:
  - platform: status
    name: Status
  - platform: template
    name: Occupancy or Movement
    id: LD1115H_MovOcc_Binary
    device_class: occupancy
  - platform: template
    name: Movement
    id: LD1115H_Mov_Binary
    device_class: motion
ESP32 Code
esphome:
  friendly_name: Studio Presence # Can be anything you like
  name: 'studio-presence' # Make sure to have the same value as in "host name" from previous steps
  on_boot: #LD1115H Initial Setting
    priority: -200
    then:
      - uart.write:
          id: LD1115H_UART_BUS
          data: !lambda |-
            std::string th1st = "th1=" + str_sprintf("%.0f",id(LD1115H_TH1).state) +" \n";
            return std::vector<uint8_t>(th1st.begin(), th1st.end());
      - uart.write:
          id: LD1115H_UART_BUS
          data: !lambda |-
            std::string th2st = "th2=" + str_sprintf("%.0f",id(LD1115H_TH2).state) +" \n";
            return std::vector<uint8_t>(th2st.begin(), th2st.end());
esp32:
  board: esp32dev
  framework:
    type: esp-idf #Suggest Use ESP-IDF Framework, or Plug Out the UART Cable Might Cause ESP32 Hang.
    version: recommended
external_components:
  - source:
      type: git
      url: https://github.com/ssieb/custom_components #Thanks for @ssieb components.
    components: [serial]
logger:
  level: DEBUG #You Can Use "INFO" Level
  baud_rate: 0

# Enable Home Assistant API
api:
  encryption:
    key: 'YOUR_ENCRYPTION_KEY' ####### Add your encryption key here #######

ota:

wifi:
  ssid: !secret wifi_ssid
  password: !secret wifi_password

  # Enable fallback hotspot (captive portal) in case wifi connection fails
  ap:
    ssid: 'YOUR_AP_SSID' ####### Add your AP SSID here #######
    password: 'YOUR_AP_PASSWORD' ####### Add your AP Password here #######

uart:
  id: LD1115H_UART_BUS
  rx_pin: GPIO16 #For ESP32, you can use any pin, Recommend Use UART_2, Don't use UART_0, It might Cause Boot Fail or System Hang
  tx_pin: GPIO17 #For ESP32, you can use any pin, Recommend Use UART_2, Don't use UART_0, It might Cause Boot Fail or System Hang
  baud_rate: 115200
  data_bits: 8
  stop_bits: 1
  parity: NONE
  setup_priority: 200 #Set Priority To Prevent Boot Loop or Fail
#  debug:
#    direction: BOTH
#    dummy_receiver: false
#    after:
#      delimiter: "\n"
#    sequence:
#      - lambda: UARTDebug::log_string(direction, bytes);
globals:
  - id: LD1115H_Last_Time
    type: time_t
    restore_value: no
    initial_value: time(NULL)
  - id: LD1115H_Last_Mov_Time
    type: time_t
    restore_value: no
    initial_value: time(NULL)
  - id: LD1115H_Clearence_Status
    type: bool
    restore_value: no
    initial_value: 'false'
status_led:
  pin:
    number: GPIO2 #ESP32 OnBroad LED
    inverted: false
#web_server:   #Avoid Using Web Server To Prevent Hang
#  port: 80
interval:
  - interval: 1s #Clearance Scan Time
    setup_priority: -200
    then:
      lambda: |-
        if ((time(NULL)-id(LD1115H_Last_Time))>id(LD1115H_Clear_Time).state) {
          if ((id(LD1115H_Clearence_Status) == false) || (id(LD1115H_Occupancy).state != "Clearance")) {
            id(LD1115H_Occupancy).publish_state("Clearance");
            id(LD1115H_Clearence_Status) = true;
          }
          if (id(LD1115H_MovOcc_Binary).state == true) {
            id(LD1115H_MovOcc_Binary).publish_state(false);
          }
          if (id(LD1115H_Mov_Binary).state == true) {
            id(LD1115H_Mov_Binary).publish_state(false);
          }
        }
number:
  - platform: template
    name: Motion Sensitivity #TH1 is Movement/Motion Sensitivity
    id: LD1115H_TH1
    icon: 'mdi:cogs'
    optimistic: true
    restore_value: true #If you don't want to store the setting at ESP, set it to false.
    initial_value: '120' #Default TH1 Setting
    min_value: 20
    max_value: 1200
    step: 10
    set_action:
      then:
        - uart.write:
            id: LD1115H_UART_BUS
            data: !lambda |-
              std::string th1st = "th1=" + str_sprintf("%.0f",x) +" \n";
              return std::vector<uint8_t>(th1st.begin(), th1st.end());
  - platform: template
    name: Presence Sensitivity #TH2 is Occupancy/Presence Sensitivity
    id: LD1115H_TH2
    icon: 'mdi:cogs'
    optimistic: true
    restore_value: true #If you don't want to store the setting at ESP, set it to false.
    initial_value: '250' #Default TH2 Setting
    min_value: 50
    max_value: 2500
    step: 10
    set_action:
      then:
        - uart.write:
            id: LD1115H_UART_BUS
            data: !lambda |-
              std::string th2st = "th2=" + str_sprintf("%.0f",x) +" \n";
              return std::vector<uint8_t>(th2st.begin(), th2st.end());
  - platform: template
    name: Clearence Time
    id: LD1115H_Clear_Time
    icon: 'mdi:cogs'
    optimistic: true
    restore_value: true #If you don't want to store the setting at ESP, set it to false.
    initial_value: '5' #LD1115H Mov/Occ > Clearence Time Here
    min_value: 0.5
    max_value: 20
    step: 0.5
  - platform: template
    name: Movement Time
    id: LD1115H_Mov_Time
    icon: 'mdi:cogs'
    optimistic: true
    restore_value: true #If you don't want to store the setting at ESP, set it to false.
    initial_value: '1' #LD1115H Mov > Occ Time Here
    min_value: 0.5
    max_value: 10
    step: 0.5
sensor:
  - platform: template
    name: Spectral line
    id: LD1115H_Spectral
    icon: 'mdi:radar'
    unit_of_measurement: ''
    accuracy_decimals: 0
  - platform: template
    name: Signal Strength
    id: LD1115H_Signal
    icon: 'mdi:signal-distance-variant'
    unit_of_measurement: ''
    accuracy_decimals: 0
    filters: # Use Fliter To Debounce
      - sliding_window_moving_average:
          window_size: 8
          send_every: 2
      - heartbeat: 0.2s
  - platform: dht
    pin: GPIO18
    temperature:
      name: Temperature
    humidity:
      name: Humidity
    update_interval: 30s
text_sensor:
  - platform: serial
    uart_id: LD1115H_UART_BUS
    name: UART Text
    id: LD1115H_UART_Text
    icon: 'mdi:format-text'
    internal: False #If Don't Want to See UART Receive Data, Set To True
    on_value:
      lambda: |-
        if (id(LD1115H_UART_Text).state.substr(0,3) == "occ") {
          id(LD1115H_Signal).publish_state(atof(id(LD1115H_UART_Text).state.substr(7).c_str()));
          id(LD1115H_Spectral).publish_state(atof(id(LD1115H_UART_Text).state.substr(5,2).c_str()));
          if ((time(NULL)-id(LD1115H_Last_Mov_Time))>id(LD1115H_Mov_Time).state) {
            id(LD1115H_Occupancy).publish_state("Occupancy");
            if (id(LD1115H_MovOcc_Binary).state == false) {
              id(LD1115H_MovOcc_Binary).publish_state(true);
            }
            if (id(LD1115H_Mov_Binary).state == true) {
              id(LD1115H_Mov_Binary).publish_state(false);
            }
          }
          if (id(LD1115H_MovOcc_Binary).state == false) {
            id(LD1115H_MovOcc_Binary).publish_state(true);
          }
          id(LD1115H_Last_Time) = time(NULL);
          if (id(LD1115H_Clearence_Status) == true) {
            id(LD1115H_Clearence_Status) = false;
          }
        }
        else if (id(LD1115H_UART_Text).state.substr(0,3) == "mov") {
          id(LD1115H_Signal).publish_state(atof(id(LD1115H_UART_Text).state.substr(7).c_str()));
          id(LD1115H_Spectral).publish_state(atof(id(LD1115H_UART_Text).state.substr(5,2).c_str()));
          id(LD1115H_Occupancy).publish_state("Movement");
          if (id(LD1115H_MovOcc_Binary).state == false) {
            id(LD1115H_MovOcc_Binary).publish_state(true);
          }
          if (id(LD1115H_Mov_Binary).state == false) {
            id(LD1115H_Mov_Binary).publish_state(true);
          }
          id(LD1115H_Last_Mov_Time) = time(NULL);
          id(LD1115H_Last_Time) = time(NULL);
          if (id(LD1115H_Clearence_Status) == true) {
            id(LD1115H_Clearence_Status) = false;
          }
        }
  - platform: template
    name: Occupancy Status
    id: LD1115H_Occupancy
    icon: 'mdi:motion-sensor'
binary_sensor:
  - platform: template
    name: Occupancy or Movement
    id: LD1115H_MovOcc_Binary
    device_class: occupancy
  - platform: template
    name: Movement
    id: LD1115H_Mov_Binary
    device_class: motion
Automation Based on Presence
One of the most exciting aspects of presence detection is the ability to automate actions based on whether someone is present or not. By creating automations, you can define specific actions to be triggered when the presence status changes. For example, you can configure your lights to turn on when someone enters a room and turn off when the room becomes unoccupied. With the power of automation, you can create a seamless and convenient environment that caters to your needs.
To create an automation based on presence, follow these steps within Home Assistant:
- Click the plus icon next to "Automations" to create a new automation.
- Under "Do Something When," select the option "Occupancy or Movement Became Occupied."
- Assign a name to the trigger Id, such as "Detected."
- Duplicate the trigger and change it to "Not Occupied," modifying the trigger ID accordingly.
- Define the desired actions for each trigger state. For example, you can turn on a specific light when occupancy is detected and turn it off when the area becomes unoccupied.
- Give your automation a descriptive name and save it.
With this automation in place, your lights will automatically respond to the presence detected by the mmWave sensor, enhancing the comfort and convenience of your smart home.
Here is the automation in YAML format:
alias: Studio Lights Presence
description: ''
trigger:
  - type: occupied
    platform: device
    device_id: 8ec6204287e043b0acba17410a1851a7
    entity_id: binary_sensor.studio_presence_occupancy_or_movement
    domain: binary_sensor
    id: detected
  - type: not_occupied
    platform: device
    device_id: 8ec6204287e043b0acba17410a1851a7
    entity_id: binary_sensor.studio_presence_occupancy_or_movement
    domain: binary_sensor
    id: cleared
condition: []
action:
  - choose:
      - conditions:
          - condition: trigger
            id: detected
        sequence:
          - service: light.turn_on
            data: {}
            target:
              entity_id: light.yeelight_stripe_0x12ac5a29
      - conditions:
          - condition: trigger
            id: cleared
        sequence:
          - service: light.turn_off
            data: {}
            target:
              entity_id: light.yeelight_stripe_0x12ac5a29
mode: single
Conclusion
Congratulations on successfully implementing presence detection in Home Assistant using the affordable LD1115H mmWave sensor and ESPHome.