- Published on
Presence Detection Using LD2410 in Home Assistant
- Authors

- Name
- Simply Smart House
In today's blog post, we'll guide you through the installation process of presence detection using the LD2410 sensor, an affordable and highly sensitive sensor capable of detecting even the tiniest movements. This sensor is natively supported in Home Assistant and can be easily integrated with ESP32 and ESPHome. The best part? No soldering is required! Let's dive in!
- Choosing ESP32 Over Bluetooth
- Sensor Specifications
- Types of LD2410 Sensors
- Understanding MMWave Technology
- Hardware Prerequisites
- The Flashing Process
- Connecting and Configuring the Device
- Wiring the Sensor
- Integrating the Presence Sensor
- Code for ESPHome versions Under 2023.8.1
- Code for ESPHome 2023.8.1 and Up
- Configuration of LD2410
- Automation Based on Presence
- Conclusion
Choosing ESP32 Over Bluetooth
When considering the integration options, I decided to go with ESP32 instead of Bluetooth. During testing, I experienced frequent disconnections and stability issues with the Bluetooth integration, as many others have also reported online. On the other hand, my ESP32 setup has been impressively stable for weeks, providing a reliable solution.
Sensor Specifications
The LD2410 module utilizes mmWave radar technology to provide highly sensitive human presence detection. It offers real-time detection of movement, distance, and presence within a room. With a detection range of up to 5 meters (16 feet) and an approximate angle of 60 degrees, it ensures comprehensive coverage.
Types of LD2410 Sensors
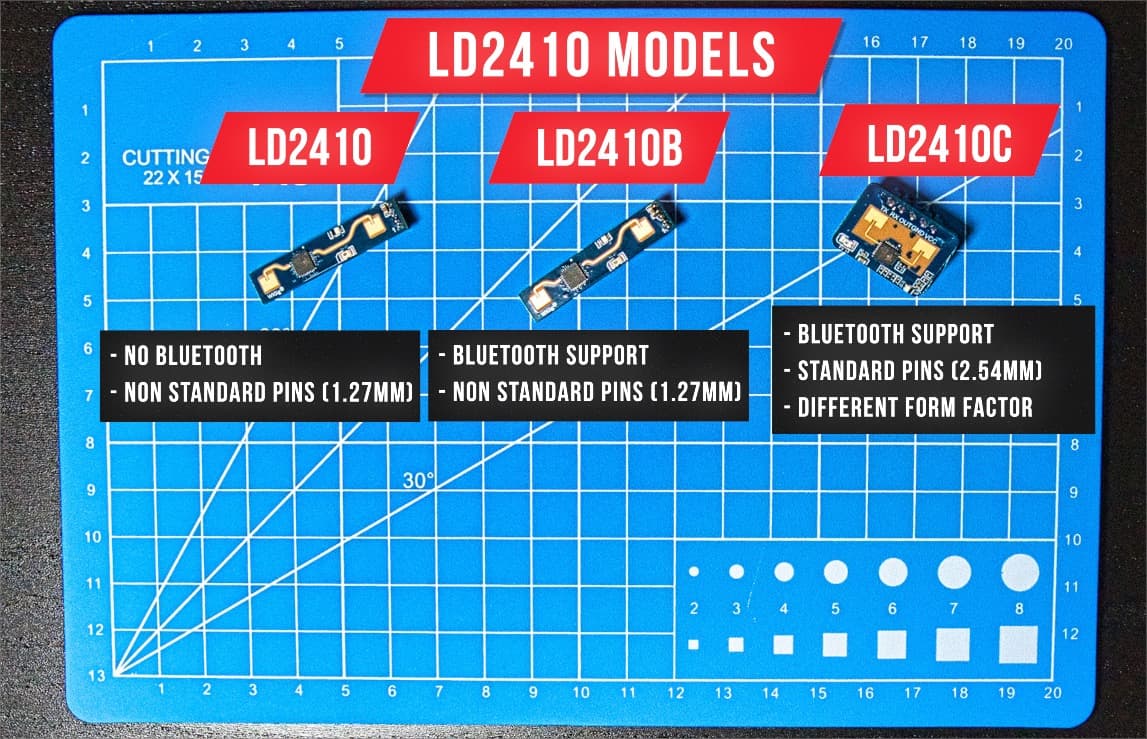
There are different versions of the LD2410 sensor available:
LD2410 and LD2410B: These versions have non-standard 1.27mm pins, requiring a special cable. The LD2410B version also includes Bluetooth functionality.
LD2410C: This version features Bluetooth and comes with standard 2.54mm pins, offering a different form factor.
Understanding MMWave Technology
Before we dive into the implementation details, let's take a moment to understand the technology behind mmWave sensors. Think of it as a radar sensor that operates similarly to how a bat navigates in a dark cave. Using waves to detect objects, mmWave sensors can accurately detect a person's breathing and movements. By leveraging this technology, we can achieve precise and reliable presence detection in our Home Assistant setup.
Hardware Prerequisites
To get started with presence detection, you'll need some essential hardware components. There are two options available, depending on which sensor you pick:
- LD2410B - This option utilizes an ESP32 board, the LD2410B sensor, and a 1.27mm to 2.54mm cable.
LD2410B MMWave Sensor With Pins (AliExpress)
LD2410B 1.27mm to 2.54mm Cable (AliExpress)
- LD2410C - This option utilizes an ESP32 board, the LD2410C sensor, and 4 jumper wires.
LD2410C MMWave Sensor With Pins (AliExpress)
LD2410C MMWave Sensor (AliExpress)
Both options are affordable and accessible, making them suitable for DIY enthusiasts and beginners alike.
The Flashing Process
Once you have your hardware ready, the next step is to flash the required software to your device. The flashing process involves installing ESPHome, a powerful tool that allows us to integrate custom firmware with Home Assistant seamlessly. Here's a step-by-step guide to the flashing process:
- Add the ESPHome integration

- Ensure that you have the correct URL and click "Open Link" to access the ESPHome web interface.
- Click on "Install" to start the installation process.
- Optionally, you can enable the watchdog and show it in sidebar.
- Once the installation is complete, click on "Open Web UI" to access the ESPHome dashboard.
Connecting and Configuring the Device
- Connect your device to your computer using a data cable and click on "Connect" in the ESPHome web interface.
- Select your device from the list of available devices and click "Connect" to establish a connection.
- On the ESPHome dashboard, click on "Prepare for First Use" and then install.
- Note: Depending on your device, you may need to hold the boot button before installing the firmware.
- Once the installation is complete, connect your device to your Wi-Fi network to ensure seamless communication with Home Assistant.
- Return to Home Assistant, and you should see your device listed in the ESPHome screen. Click on "Adopt" to add it to your setup.
- Give your device a meaningful name, such as "bathroom-presence" or any other descriptive name that suits your setup.
- After adopting the device, click skip and close.
- click on the three dots and "rename hostname" give it a name such as "bathroom-presence".
Wiring the Sensor
To make your presence detection system functional, you need to wire the mmWave sensor to your device. Depending on the hardware option you chose, follow these wiring instructions:
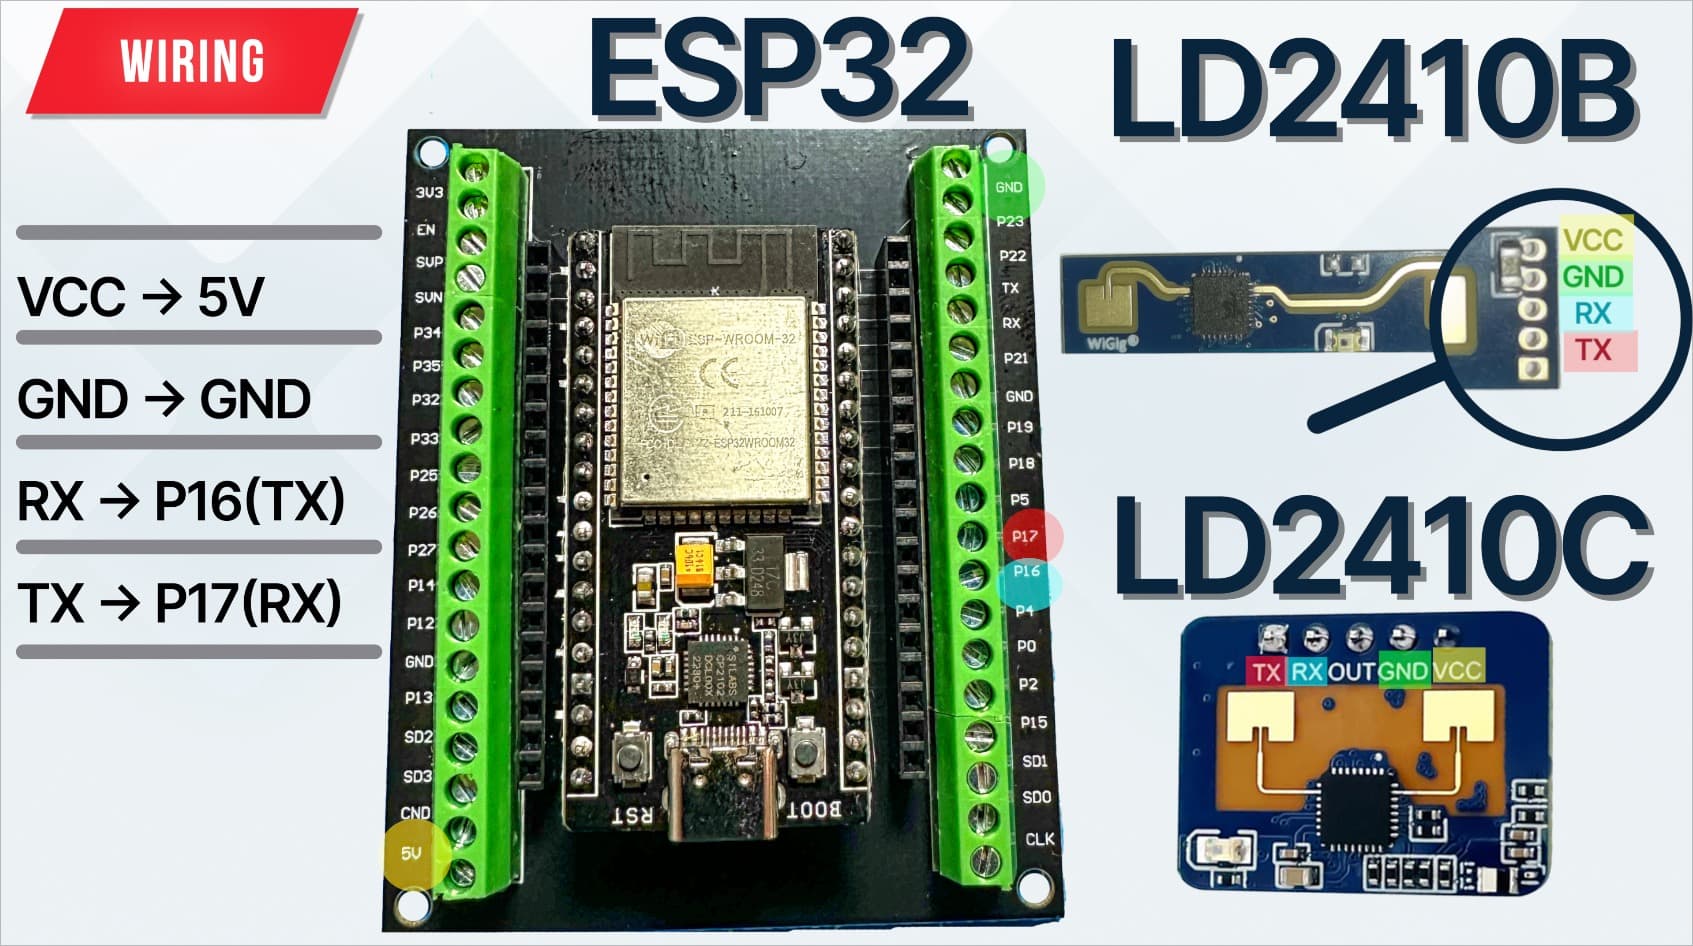
For the ESP32:
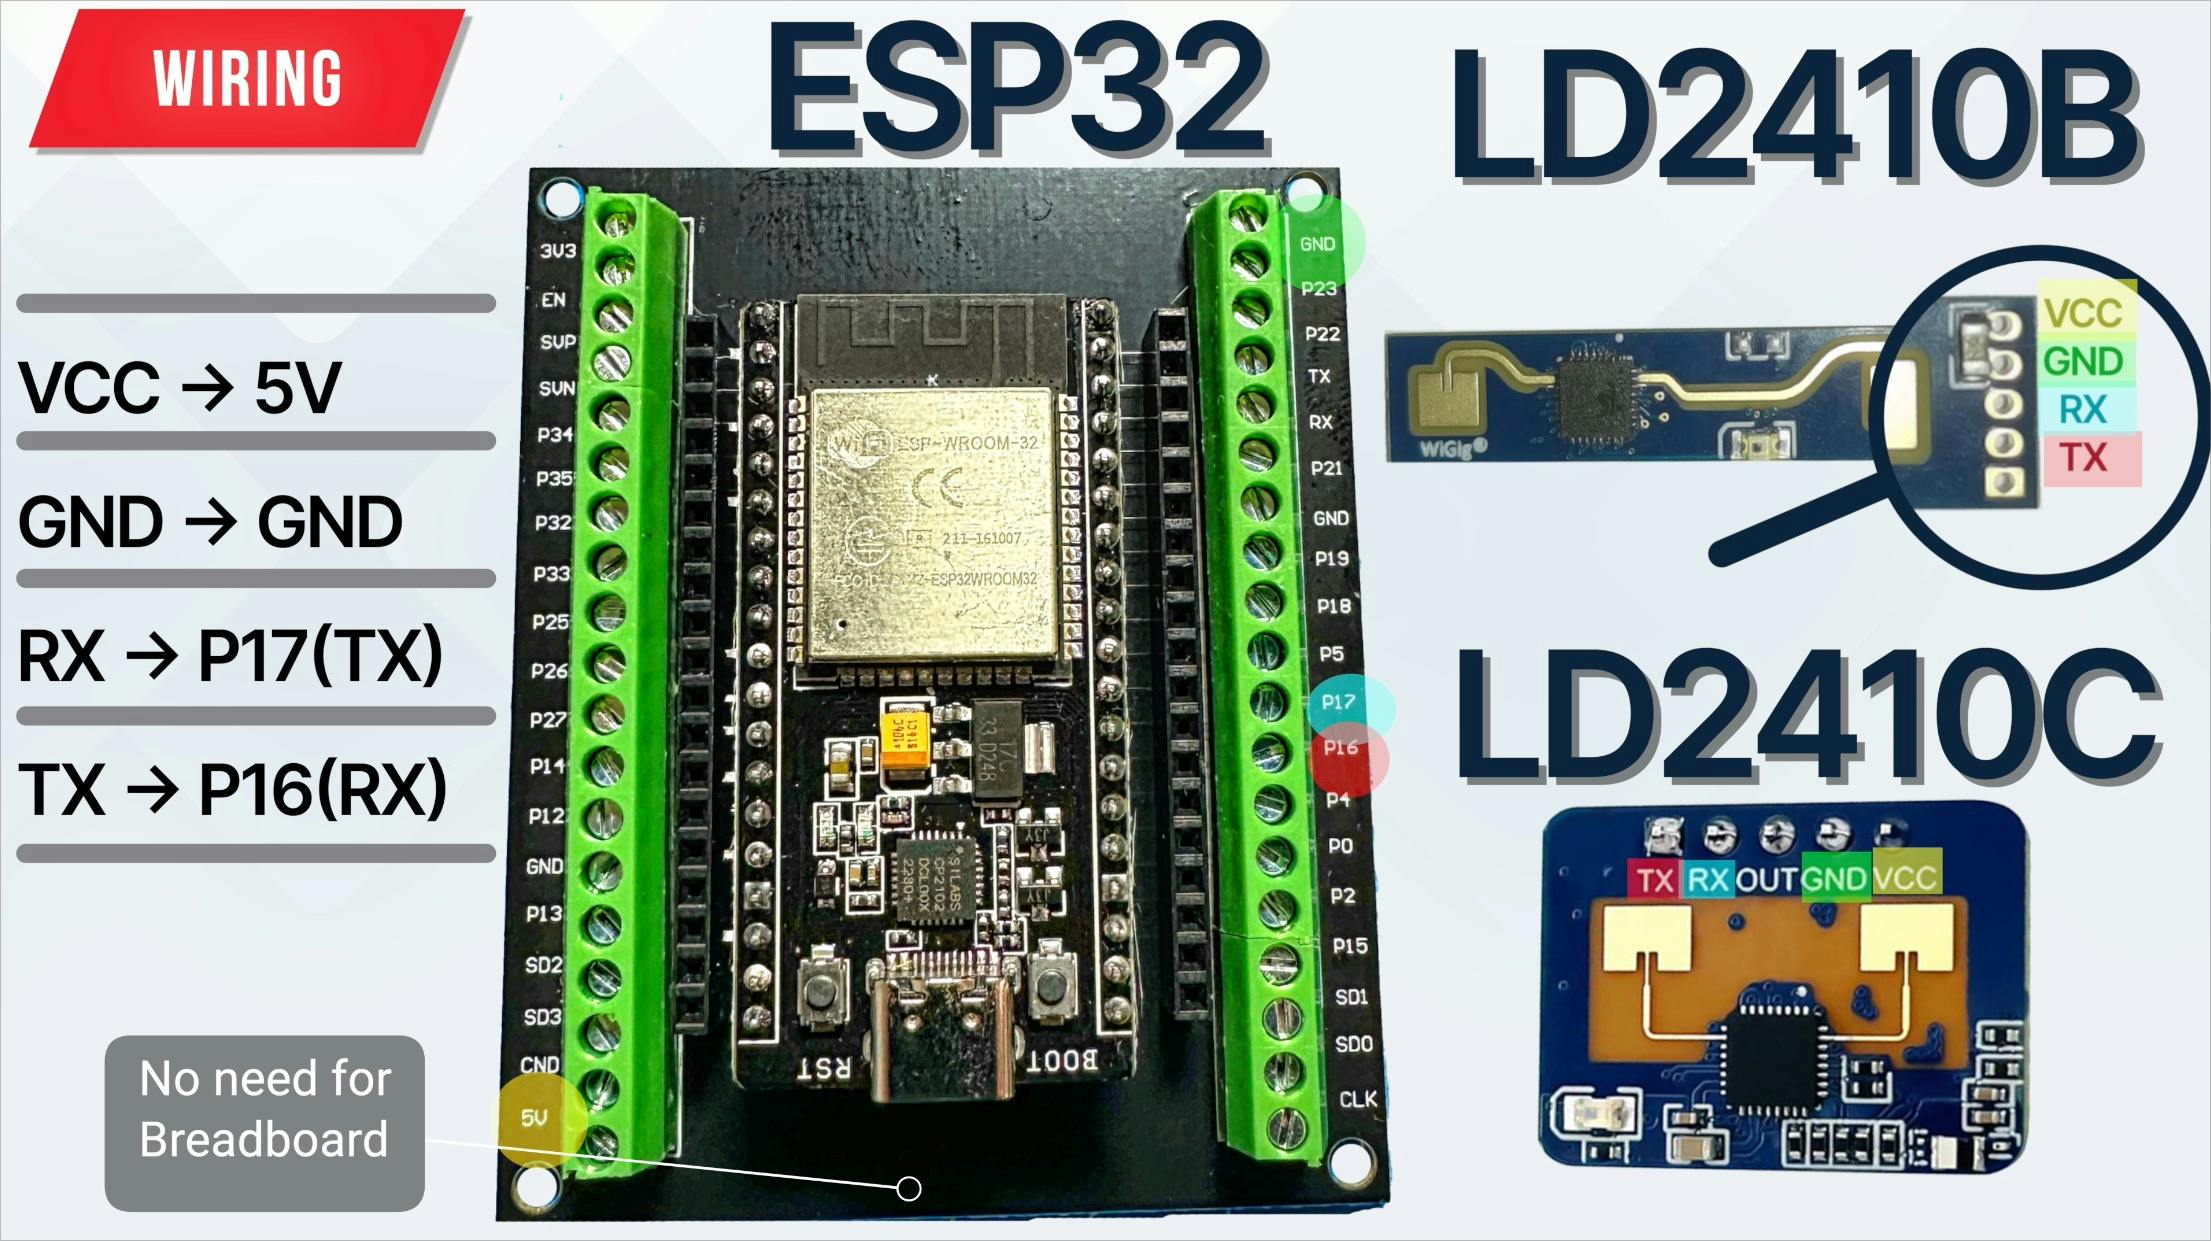
- Vcc to 5v
- Ground to ground
- RX to P17(TX)
- TX to P16(RX)
Integrating the Presence Sensor
- Return to ESHPhome and click "Edit" on your device.
- Add this configuration:
I used the offical ESPHome settings, and tweaked it a bit for my needs.
Code for ESPHome versions Under 2023.8.1
uart:
  tx_pin: 17
  rx_pin: 16
  baud_rate: 256000
  parity: NONE
  stop_bits: 1

ld2410:
  timeout: 5s
  max_move_distance: 2.25m
  max_still_distance: 2.25m
  g0_move_threshold: 40 # 0m / 0'
  g0_still_threshold: 10 # 0m / 0'
  g1_move_threshold: 40 # 0 - 0.75m / 0 - 2.46'
  g1_still_threshold: 10 # 0 - 0.75m / 0 - 2.46'
  g2_move_threshold: 40 # 0.75 - 1.5m / 2.46' - 4.92'
  g2_still_threshold: 10 # 0.75 - 1.5m / 2.46' - 4.92'
  g3_move_threshold: 40 # 1.5 - 2.25m / 4.92' - 7.38'
  g3_still_threshold: 10 # 1.5 - 2.25m / 4.92' - 7.38'
  g4_move_threshold: 40 # 2.25 - 3m' / 7.38' - 9.84'
  g4_still_threshold: 40 # 2.25 - 3m' / 7.38' - 9.84'
  g5_move_threshold: 40 # 3 - 3.75 / 9.84' - 12.30'
  g5_still_threshold: 40 # 3 - 3.75 / 9.84' - 12.30'
  g6_move_threshold: 30 # 3.75 - 4.5m / 12.30' - 14.76'
  g6_still_threshold: 15 # 3.75 - 4.5m / 12.30' - 14.76'
  g7_move_threshold: 30 # 4.5 - 5.25m / 14.76' - 17.22'
  g7_still_threshold: 15 # 4.5 - 5.25m / 14.76' - 17.22'
  g8_move_threshold: 30 # 5.25 - 6m / 17.22' - 19.68'
  g8_still_threshold: 15 # 5.25 - 6m / 17.22' - 19.68'

sensor:
  - platform: ld2410
    moving_distance:
      name: Moving Distance
    still_distance:
      name: Still Distance
    moving_energy:
      name: Move Energy
    still_energy:
      name: Still Energy
    detection_distance:
      name: Detection Distance

binary_sensor:
  - platform: ld2410
    has_target:
      name: Presence
    has_moving_target:
      name: Moving Target
    has_still_target:
      name: Still Target
Code for ESPHome 2023.8.1 and Up
uart:
  id: ld2410_uart
  tx_pin: 17
  rx_pin: 16
  baud_rate: 256000
  parity: NONE
  stop_bits: 1

ld2410:
  uart_id: ld2410_uart

number:
  - platform: ld2410
    timeout:
      name: Timeout
    light_threshold:
      name: Light Threshold
    max_move_distance_gate:
      name: Max Move Distance Gate
    max_still_distance_gate:
      name: Max Still Distance Gate
    g0:
      move_threshold:
        name: g0 move threshold
      still_threshold:
        name: g0 still threshold
    g1:
      move_threshold:
        name: g1 move threshold
      still_threshold:
        name: g1 still threshold
    g2:
      move_threshold:
        name: g2 move threshold
      still_threshold:
        name: g2 still threshold
    g3:
      move_threshold:
        name: g3 move threshold
      still_threshold:
        name: g3 still threshold
    g4:
      move_threshold:
        name: g4 move threshold
      still_threshold:
        name: g4 still threshold
    g5:
      move_threshold:
        name: g5 move threshold
      still_threshold:
        name: g5 still threshold
    g6:
      move_threshold:
        name: g6 move threshold
      still_threshold:
        name: g6 still threshold
    g7:
      move_threshold:
        name: g7 move threshold
      still_threshold:
        name: g7 still threshold
    g8:
      move_threshold:
        name: g8 move threshold
      still_threshold:
        name: g8 still threshold

select:
  - platform: ld2410
    distance_resolution:
      name: Distance Resolution
    baud_rate:
      name: Baud Rate
    light_function:
      name: Light Function
    out_pin_level:
      name: Out Pin Level

sensor:
  - platform: ld2410
    light:
      name: Light
    moving_distance:
      name: Moving Distance
    still_distance:
      name: Still Distance
    moving_energy:
      name: Move Energy
    still_energy:
      name: Still Energy
    detection_distance:
      name: Detection Distance
    g0:
      move_energy:
        name: g0 move energy
      still_energy:
        name: g0 still energy
    g1:
      move_energy:
        name: g1 move energy
      still_energy:
        name: g1 still energy
    g2:
      move_energy:
        name: g2 move energy
      still_energy:
        name: g2 still energy
    g3:
      move_energy:
        name: g3 move energy
      still_energy:
        name: g3 still energy
    g4:
      move_energy:
        name: g4 move energy
      still_energy:
        name: g4 still energy
    g5:
      move_energy:
        name: g5 move energy
      still_energy:
        name: g5 still energy
    g6:
      move_energy:
        name: g6 move energy
      still_energy:
        name: g6 still energy
    g7:
      move_energy:
        name: g7 move energy
      still_energy:
        name: g7 still energy
    g8:
      move_energy:
        name: g8 move energy
      still_energy:
        name: g8 still energy

binary_sensor:
  - platform: ld2410
    has_target:
      name: Presence
    has_moving_target:
      name: Moving Target
    has_still_target:
      name: Still Target
    out_pin_presence_status:
      name: Out Pin Presence Status

switch:
  - platform: ld2410
    engineering_mode:
      name: Engineering Mode
    bluetooth:
      name: Control Bluetooth

button:
  - platform: ld2410
    factory_reset:
      name: Factory Reset
    restart:
      name: Restart
    query_params:
      name: Query Params

text_sensor:
  - platform: ld2410
    version:
      name: Firmware Version
    mac_address:
      name: MAC
Configuration of LD2410
To configure the LD2410 sensor, adjust the following parameters:
Timeout: Determines the duration for the sensor to clear. Max move and still distance: Define the maximum range for the sensor. Customize it based on your specific needs. Sensitivity Levels: The sensor provides sensitivity threshold from 0 to 100. Higher values indicate lower sensitivity. Experiment to find the ideal setting for your use case. Optimal Sensor Placement:
In my demonstration, I placed the LD2410 sensor at a 45° angle diagonally in a 2m by 2m bathroom. For better wife approval, consider installing the sensor in the ceiling. It can even detect movement through plastic surfaces. To simplify the connection process, make use of Terminal Wire To USB (Amazon).
Alternate Case Solution: I also printed a 3D case for the sensor. However, if you don't have access to a 3D printer, don't worry! You can easily find affordable project boxes in various sizes that will serve the purpose.
LD2410 Drawback: One thing to keep in mind is that the LD2410 sensor may not perform optimally in "noisy" rooms. Fans, moving curtains, or even a robot vacuum can trigger false presence detection. If you plan to use the sensor in such an environment, take this into account and adjust accordingly.
Future Plans: To address the "noise" issue, I'm currently testing a multi-sensor setup combining the LD2410 sensor with a PIR sensor. Stay tuned for the next video in the series, where I'll share the details of this setup. Be sure to subscribe so you won't miss it!
Mobile App Option: If you prefer controlling the sensor settings via Bluetooth, there's an app available called HLKRadarTool for iOS users. For Android users you can download the APK here.
Automation Based on Presence
One of the most exciting aspects of presence detection is the ability to automate actions based on whether someone is present or not. By creating automations, you can define specific actions to be triggered when the presence status changes. For example, you can configure your lights to turn on when someone enters a room and turn off when the room becomes unoccupied. With the power of automation, you can create a seamless and convenient environment that caters to your needs.
To create an automation based on presence, follow these steps within Home Assistant:
- Click the plus icon next to "Automations" to create a new automation.
- Under "Do Something When," select the option "Occupancy or Movement Became Occupied."
- Assign a name to the trigger Id, such as "Detected."
- Duplicate the trigger and change it to "Not Occupied," modifying the trigger ID accordingly.
- Define the desired actions for each trigger state. For example, you can turn on a specific light when occupancy is detected and turn it off when the area becomes unoccupied.
- Give your automation a descriptive name and save it.
With this automation in place, your lights will automatically respond to the presence detected by the mmWave sensor, enhancing the comfort and convenience of your smart home.
Here is the automation in YAML format:
alias: Bathroom Presence
description: ''
trigger:
  - type: not_occupied
    platform: device
    device_id: e17b44140d1b10cd1a87be238dc14f4e
    entity_id: binary_sensor.bathroom_presence_presence
    domain: binary_sensor
    id: cleared
  - type: occupied
    platform: device
    device_id: e17b44140d1b10cd1a87be238dc14f4e
    entity_id: binary_sensor.bathroom_presence_presence
    domain: binary_sensor
    id: detected1
condition: []
action:
  - choose:
      - conditions:
          - condition: trigger
            id: detected
        sequence:
          - service: light.turn_on
            data: {}
            target:
              area_id: bathroom
      - conditions:
          - condition: trigger
            id: cleared
        sequence:
          - service: light.turn_off
            data: {}
            target:
              area_id: bathroom
mode: single
Conclusion
The LD2410 sensor is an excellent choice for reliable presence detection. Its seamless integration with ESPHome and affordability at just $5 make it an attractive option. If you found this video helpful, please give it a thumbs up. Thank you for watching, and happy automating!